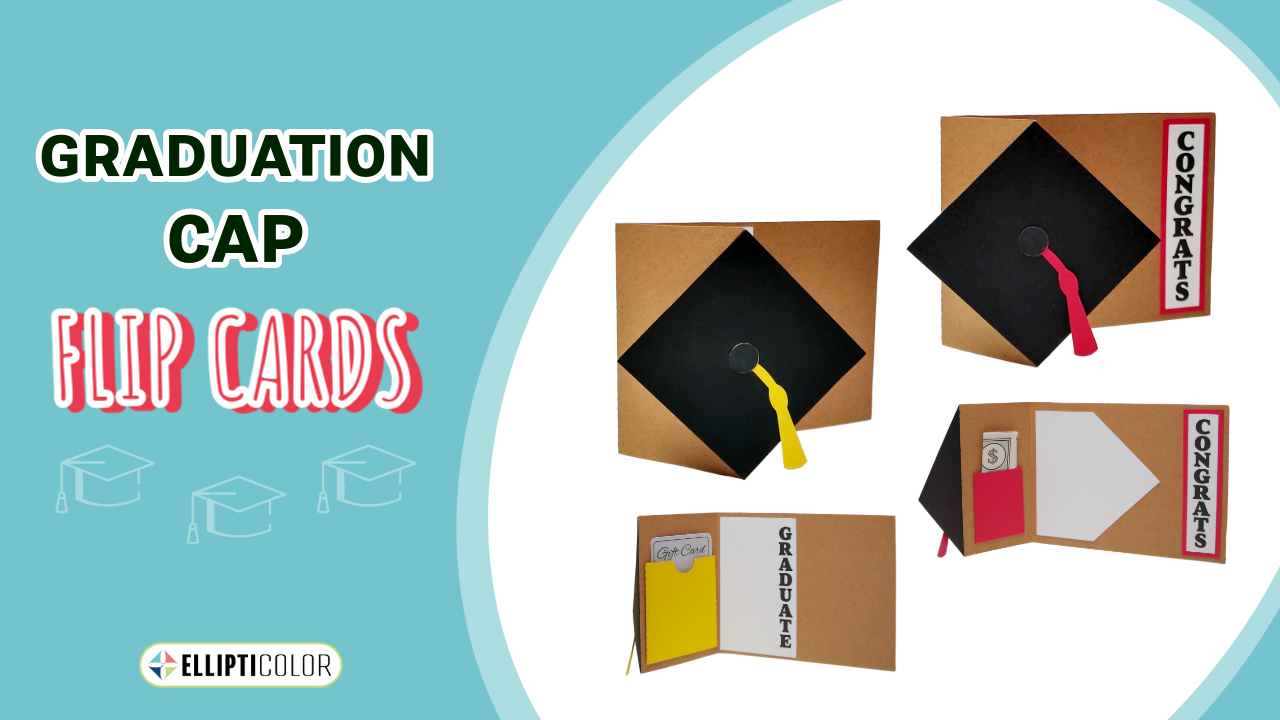
If you're looking for a creative way to give cash or a gift card to your graduate, try these Graduation Cap Flip Cards.
I made these cards for several graduates and to make them extra fun I personalized them with school colors, a handwritten message, and a gift card tucked in the pocket.
Want to make these cards? Keep reading for step-by-step instructions or scroll to the end to watch our assembly video.
Prepare to Make Card
Materials Needed
- Cardstock (Make it extra special with school colors!)
- Glue
- Printer
- Cutting Machine (Such as Cricut, Silhouette, Brother ScanNCut, etc.)
- Cash or Gift Card to add to the card when it's complete
Digital Files Needed
You will need one of the Graduation Cap Flip Cards.
There are two styles to choose from:
- Graduation Cap Flip Card-01 (Cash Pocket)
- Graduation Cap Flip Card-02 (Gift Card Pocket)
Prepare Pieces to Assemble
- Cut out the SVG or DXF pieces for one of the Graduation Cap Flip Cards. Make sure you prepare the pieces for the card style you want because the pieces are different sizes.
- Print and Cut the 'Congrats' or 'Graduate' PNG for the card you are making.
- Tip: Refer to the Maker Guide PDF resource included with the Graduation Cap Flip Card digital files for helpful printing, cutting, and group/attach information.
Card Assembly Instructions
Card Base and Graduation Cap
- Start with the card base.
- Fold the left score line backward and the right score line forward.
- To make the graduation cap, glue the square cap piece onto the card base by lining up the edges and points.
- Next, glue the dot to the tassel and glue the tassel dot in the middle of the cap square with the tassel hanging downwards.
Cash or Gift Card Pocket
- To make the cash or gift card pocket, fold the bottom tab up and add a dot of glue on each end of the bottom tab.
- Fold the side tabs in and stick to the dots of glue on the bottom tab.
Final Touches: Card 1 (Cash Pocket)
- Glue the pocket inside the left flap of the card by placing glue along the edge of the 3 folded tabs. Be careful not to glue the pocket shut.
- Glue the note insert towards the center of the card so that the cap fully covers it when the card is closed.
- Glue the border on the back of the ‘Congrats’ or ‘Graduate’ greeting.
- Close the card and glue the greeting onto the right edge of the card
- Add cash to the pocket and a handwritten note.
Final Touches: Card 2 (Gift Card Pocket)
- Glue the pocket inside the left flap of the card by placing glue along the edge of the 3 folded tabs. Be careful not to glue the pocket shut.
- Glue the ‘Congrats’ or ‘Graduate’ note next to the pocket so that the cap fully covers it when the card is closed.
- You can swap places with the pocket and note card if you want to.
- Add a gift card to the pocket and a handwritten note.
These graduation cap flip cards are a fun and unique way to present a gift and show your graduate how much you care. Get creative with colors and personalize each card to make it extra special for your graduate!